
By Alex Wang | International Business Director, Apex Quartz Stone | October 20, 2026 | Reading Time: 12 min
A quartz slab seam stays visible for exactly four reasons: the adhesive colour does not match the slab, the two slab faces are not flush, the sheen across the joint differs from the sheen either side of it, or the pattern stops dead at the joint. Everything a fabricator does to hide a seam is aimed at those four variables and nothing else. The working recipe is a joint width of 0.3–0.5 mm, lippage under 0.2 mm, a two-part epoxy tinted to the slab under daylight rather than shop lighting, and a seam placed over a cabinet divider so both sides are fully supported. Achieve those and the seam will be invisible from a metre away in daylight and only faintly detectable when light rakes across the surface at 45 degrees, which is the honest definition of a good seam.
That definition matters because the promise of a “seamless” quartz worktop is the most common misunderstanding in the trade. Standard jumbo slabs are 3,200 × 1,600 mm, and after edge trimming a run longer than about 3.1 m cannot come from one piece. Because most kitchens have a 3.6–4.2 m back run, at least one seam is not a defect — it is arithmetic. What follows is the mechanics, the placement rules, the seven-step build sequence, a grading scale to use on site, and the failures that show up six months later.
TL;DR
- Seams show because of colour mismatch, lippage, gloss difference or pattern interruption — four fixable variables, not one unavoidable one.
- The tolerance band that delivers an invisible-at-one-metre joint is 0.3–0.5 mm joint width with lippage below 0.2 mm.
- Place seams over cabinet dividers or appliance end panels, and keep them at least 100 mm clear of sink and cooktop cutouts and 150 mm from cutout corners.
- Vein-matched seams look dramatically better on patterned slabs but typically consume 15–25% more material, so cost it as a design decision, not a fabrication detail.
- Judge the finished seam at one metre in daylight first, then at 45 degrees in raking light; anything clearly visible from standing height is out of tolerance.
Why Do Some Seams Disappear While Others Glow?
They glow because light behaves differently at the joint than on the slab, and that difference comes from three optical variables plus one geometric one. Optically, a seam is visible when the adhesive has a different colour (a contrast problem), a different gloss level (a reflectance problem), or no pattern continuity (an interruption problem). Geometrically, it is visible when one slab sits a fraction of a millimetre proud of the other, which casts a micro-shadow that no amount of polishing removes.
The gloss variable is the one most often overlooked, and it is measurable. Specular gloss is quantified by measuring reflected light at defined angles — 20, 60 and 85 degrees — which is what ASTM D523 does, and the reason the standard exists is that small instrumental differences correspond to visible differences in sheen. A gloss difference of roughly 5–10 gloss units at 60 degrees is enough to read as a sheen band across a seam when light rakes the surface at 45 degrees, even when the colour match is perfect and the surfaces are dead flush. That is why a seam can look flawless in the shop under diffuse light and obvious in a kitchen with a west-facing window.
The colour variable is subtler. Two-part epoxy shrinks slightly as it cures and darkens by roughly a shade, and the tint is judged by eye against a moving reference. Because a match made under 4,000 K workshop fluorescent light can fail by two or three ΔE under daylight, best practice is to tint under daylight or a D65 lamp and accept a slightly lighter match — a touch light reads as a shadow, while a touch dark reads as a line.
Where Should the Seam Go?
It should go where the top is continuously supported and where nobody’s eye is drawn, which in practice means over a cabinet divider or an appliance end panel, never near a cutout. Support is not a cosmetic preference: engineered quartz is strong in compression and comparatively weak in flexure, which is exactly what the quarter-point beam loading in ASTM C880 measures, and a seam over an open cabinet span is the one place a concentrated load has no backup. The placement rules that follow from that are consistent across every good shop I have worked with:
| Seam position | Verdict | Why |
|---|---|---|
| Over a cabinet divider or end panel | Preferred | Continuous support on both sides, so deflection across the joint is negligible. |
| Aligned with the centreline of a tall cabinet or appliance tower | Good | The vertical line above the seam disguises it in the room’s composition. |
| Within 100 mm of a sink or cooktop cutout | Avoid | Cutouts concentrate stress; a seam nearby becomes the crack path. |
| Within 150 mm of a cutout corner | Never | Corner plus seam is the classic radial crack origin in quartz tops. |
| Directly over a dishwasher | Avoid if possible | Repeated heat and moisture cycles work on the adhesive and the substrate simultaneously. |
| Centred on an island’s main sightline | Poor | Guests look at the island from the room’s entry point; offset the seam instead. |
| At a waterfall edge return | Accept and plan | A waterfall needs a joint by design, so detail it as a visible mitre rather than pretending it is hidden. |
Two placement habits separate experienced template makers. The first is drawing a seam map before cutting anything — a one-page plan showing every joint, its offset from the cutouts, and the vein direction across it — and having the client approve that page rather than the finished top. The second is orienting the seam to the grain: on a veined pattern, a seam that crosses veins at an angle looks like a repair, while a seam that runs along a vein field’s natural break looks like part of the design. Because veined slabs give the fabricator a choice of where the pattern breaks, the best seams are chosen on the slab rack and not at the saw.
How Is a Seam Actually Built? Seven Steps
It is built in a sequence where each step protects the previous one, and skipping any single step produces the failures in the next section. This is the sequence our fabrication partners describe:
- Template and set out. Laser or physical template taken with the cabinets installed and levelled, then a seam map drawn and approved. A seam drawn on site after cutting is a seam chosen by the saw, not by the design.
- Dry-fit and shim. Both pieces set dry, checked for flush at the joint and for the correct overhang. Any substrate void within 150 mm of the seam is packed and glued, because a void telegraphs through the joint later.
- Joint the edges square. Both mating edges are jointed on a straight-line machine or with a router jig to 90° ± 0.5° and checked with a square. A slightly bevelled edge guarantees a visible dark line, however good the adhesive is.
- Colour-match the adhesive. Two-part epoxy tinted against the actual slab, matched in daylight or under a D65 lamp, with a small test bead cured on an offcut before the real joint is filled. Matching to the average tone of the area adjacent to the joint — not to the vein — is the reliable method.
- Apply, clamp, hold. Adhesive applied to both faces, pieces drawn together with suction cups and clamps, flushness checked with a straight edge and a 0.05 mm feeler while the adhesive is still workable. Hold time is 15–30 minutes for most two-part epoxies, longer in a cold shop.
- Trim at cure. Excess adhesive razor-trimmed at roughly 24 hours, at a shallow angle, once only. Repeated scraping over a semi-cured joint pulls adhesive out of the gap and leaves a shallow trough that polishes up as a line.
- Cross-polish the joint. Wet polishing across the seam with a hard backer at 800, then 1,500, then 3,000 grit, blending 100–150 mm either side, followed by a final sheen polish over the whole area. This step is what closes the gloss difference, and it is the step most often rushed.
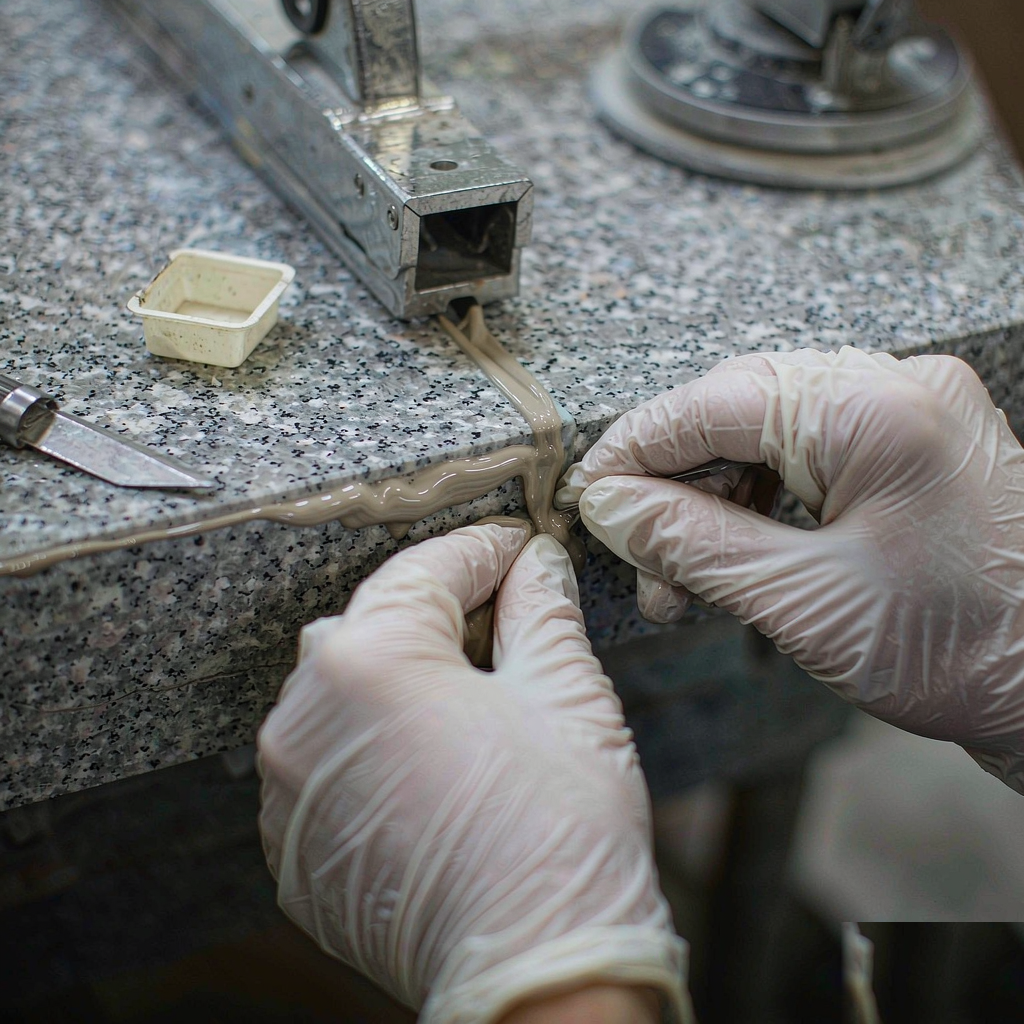
Step four: colour matched under daylight, applied to both faces, clamped while the adhesive is still workable.
The tolerance that does most of the work: a joint held at 0.3–0.5 mm with lippage under 0.2 mm will look good even with an average colour match, while a 1.2 mm joint will look poor even with a perfect one. Adhesive quantity is what the eye reads as width, so joint discipline beats tinting skill every time.
How Do You Judge a Finished Seam?
You judge it twice, in a fixed order: first from a standing position at one metre in daylight, then deliberately along the surface with light raking across it at about 45 degrees. The first pass is what the client sees every day and the second pass is what a critical visitor will do, and a seam that passes both is done. What “done” looks like is worth writing down, because it converts an argument into a standard:
| Level | What you see at 1 m in daylight | What you see in 45° raking light | Typical cause |
|---|---|---|---|
| L1 | Nothing; you have to be told where the seam is | A faint hairline, no sheen band | Correct tolerances, good tint, cross-polished |
| L2 | A hairline you can find if you look for it | A visible hairline, slight sheen variation | Acceptable commercial standard; minor gloss difference |
| L3 | A visible line, pattern interrupted | Clear line, sheen band across 100 mm | Unmatched veining or incomplete cross-polish |
| L4 | Obvious line, or a shadow along the joint | Shadow at the joint under any angle | Lippage above 0.2 mm or a joint over 1 mm |
| L5 | Dark seam, or a crack | Crack propagates from the joint | Adhesive failure, wrong tint, seam near a cutout |
Two measurement notes make that scale usable rather than decorative. Joint width is checked with a feeler gauge or a steel rule held flat across the joint, and a joint measuring more than 1 mm should be rejected before the adhesive cures, because no amount of polishing will narrow it later. Lippage is checked with a 300 mm straight edge spanning the joint plus a 0.05 mm feeler: if the feeler passes under the straight edge at the joint but not 50 mm away, the pieces are not flush.
Why Do Seams Fail Six Months Later?
They fail because the joint is the only part of the top that is not solid slab, so every mechanism that attacks the top concentrates there. Heat, moisture, cleaning chemistry, structural deflection and adhesive shrinkage all act on a 0.4 mm band of polymer between two rigid plates, and the failure modes are remarkably consistent once you know what to look for:
| What you see | Mechanism | Correct fix |
|---|---|---|
| Bright “skyline” along the joint | Lippage from uneven slab thickness or a high substrate | Re-set or replace the section; surface grinding alters the sheen permanently |
| Dark line, widening over months | Adhesive tinted too dark, or a joint that was over-wide from the start | Route to two-thirds depth, re-fill lighter, re-polish |
| Hazy bloom beside the seam | Adhesive residue wiped rather than trimmed, then polished into the surface | Fine abrasive sequence over the affected area |
| Fine star cracks at the joint edge | Excess clamp pressure on a thin edge, or a chipped arris | Local repair; the edge profile usually needs re-dressing |
| Shadow that reappears after re-polishing | Substrate void or missing shim under the joint | Remove the section, pack and glue the substrate, reinstall |
| Crack radiating from the seam | Seam placed too close to a cutout corner, or impact at the edge | Section replacement; repair is cosmetic only at this stage |
The maintenance side is simpler than most homeowners expect, and the main risk is over-cleaning rather than neglect. Abrasive creams and scouring pads dull the polished surface around the joint faster than the joint itself, which creates exactly the gloss mismatch the fabricator worked to remove. Because the seam is polymer and the slab either side is not, aggressive chemistry attacks the seam first — so a pH-neutral cleaner and a soft cloth protect the joint more effectively than any specialist product, consistent with the care guidance published by the Natural Stone Institute, which recommends neutral cleaners and warns that abrasive powders scratch.
Does a Darker Slab Hide Seams Better?
No — it hides a different part of the problem, and this is where most expectations go wrong. On a dark polished slab, a slightly wrong adhesive tint is nearly undetectable because the contrast is low; but any height difference or gloss variation reflects light against a dark field and reads as a bright line. On a light veined slab the reverse holds: a colour mismatch is visible, while a 0.1 mm height difference almost disappears.
| Slab type | Hides well | Shows badly | Where to spend the effort |
|---|---|---|---|
| Solid white or off-white | Vein interruption, small lippage | Any tint difference; adhesive yellowing over time | Tint matching and adhesive stability |
| Dark or black polished | Tint mismatch | Lippage, gloss bands, dust and fingerprints in the joint | Flushness and cross-polishing |
| Heavily veined, e.g. Calacatta-style | Small colour differences | Pattern that stops dead or mirrors wrongly | Vein matching and slab selection |
| Fine-grain speckled | Almost everything except geometry | Lippage; a seam that cuts the grain direction | Jointing accuracy |
| Crystal mirror finish | Very little | Gloss differences, because the surface is designed to reflect | Sheen blending; consider a visible mitre instead |
That table is why I push back when a designer asks for “the slab that hides seams”. There is no such slab; there is a slab whose failure mode your fabricator is best equipped to control. On a heavily veined slab the leverage is in slab selection and vein matching, which is a design decision with a real cost — vein-matched seams typically consume 15–25% more material because adjacent slabs must be selected and oriented as a pair, and the offcuts from one rarely suit the other. On a plain white the leverage is entirely in tint discipline, which costs almost nothing but demands daylight and patience.
What Should Be Written Into the Fabrication Order?
Write the seam into the order as a specification with numbers, because a verbal instruction becomes an opinion the moment there is a dispute. Six items cover it, and any fabricator who resists putting them in writing is telling you something useful:
- An approved seam map, signed before cutting, showing each joint’s position, its distance from cutouts, and the vein direction across it.
- Tolerances in figures: joint width 0.3–0.5 mm, lippage not exceeding 0.2 mm, measured with a feeler gauge and a 300 mm straight edge.
- Adhesive identified by brand and tint code, colour-matched in daylight, with approval of a cured test bead on an offcut.
- Inspection conditions named: assessed at one metre in daylight and at 45 degrees in raking light, at practical completion, before the client’s final payment.
- Material allowance stated where vein matching is required, so the 15–25% extra material is priced visibly rather than discovered as a change order.
- Remedy defined for a seam outside tolerance — re-polish, re-fill or section replacement — with who bears the cost.
Ten years ago this list would have seemed excessive for a countertop. It is not, because the slabs have become more graphic: a book-matched surface makes every joint an editorial decision, and a client who paid for pattern continuity will judge the seam as part of the design. On a Calacatta white quartz countertop in a custom size, a badly placed seam can undo the whole slab selection; on a polished quartz kitchen countertop in a plain tone, the same seam is a five-minute conversation.
The practical conclusion is unglamorous and reliable: seams are an arithmetic consequence of slab length, they are judged by the eye under specific light, and they are made or lost on four measurable variables. Fabricators who win repeat work are not the ones with a secret adhesive — they are the ones who cut the joint square, clamp it flush, tint in daylight and polish across it properly, every time. At Apex we press slabs to 3,200 × 1,600 mm and inspect every batch for thickness consistency, because a slab that varies 0.5 mm across its width hands the fabricator a lippage problem no technique can solve. If you are specifying a veined or crystal mirror quartz slab range where seams will be visible, ask our engineered quartz stone team for the thickness tolerance data on the specific color before you template — it is the cheapest way to avoid the seam you cannot fix.
Frequently Asked Questions
The Seam Is the Test
Anyone can sell a beautiful slab; the seam is where a fabricator’s discipline becomes visible, and it is the part of the job a client will examine for the next twenty years. Four variables, two measurements and one inspection condition — colour, gloss, flushness, pattern, at 0.3–0.5 mm and 0.2 mm, judged at one metre and at 45 degrees — cover everything that decides whether a joint reads as a hairline or a scar.
Most seam complaints we hear about are not adhesive failures at all. They start upstream, with a slab that was not flat, or a template taken before the cabinets were levelled, or a seam map drawn after the saw had already chosen. Fix the inputs and the joint almost takes care of itself.
Alex Wang
Alex Wang leads international business development at Quanzhou APEX Co., Ltd. (Apex Quartz Stone), an engineered quartz manufacturer founded in 1997 in Shuitou Town, Nan’an, Quanzhou, Fujian, China. The company operates a 40,000 m² production facility with an annual output of more than 100,000 quartz slabs, exporting to over 20 countries, and works with fabrication partners on slab flatness and thickness tolerance as part of its quality control programme.
Post time: Oct-23-2026